A few months ago, I put together a grouping of recipes for making the most of our Central Kentucky harvest and eating seasonally. The seasons are now changing and so is our selection of local fruits and vegetables, which are now dappling our produce department with flecks of warm fall colors and shouts of the brighter, late summer specialties. Here’s a collection of my current go-to recipes for eating the bounty being pulled from the fields this time of year.
Seared Okra & Tomatoes
Recipe & photo by Elise Bauer for SimplyRecipes.com
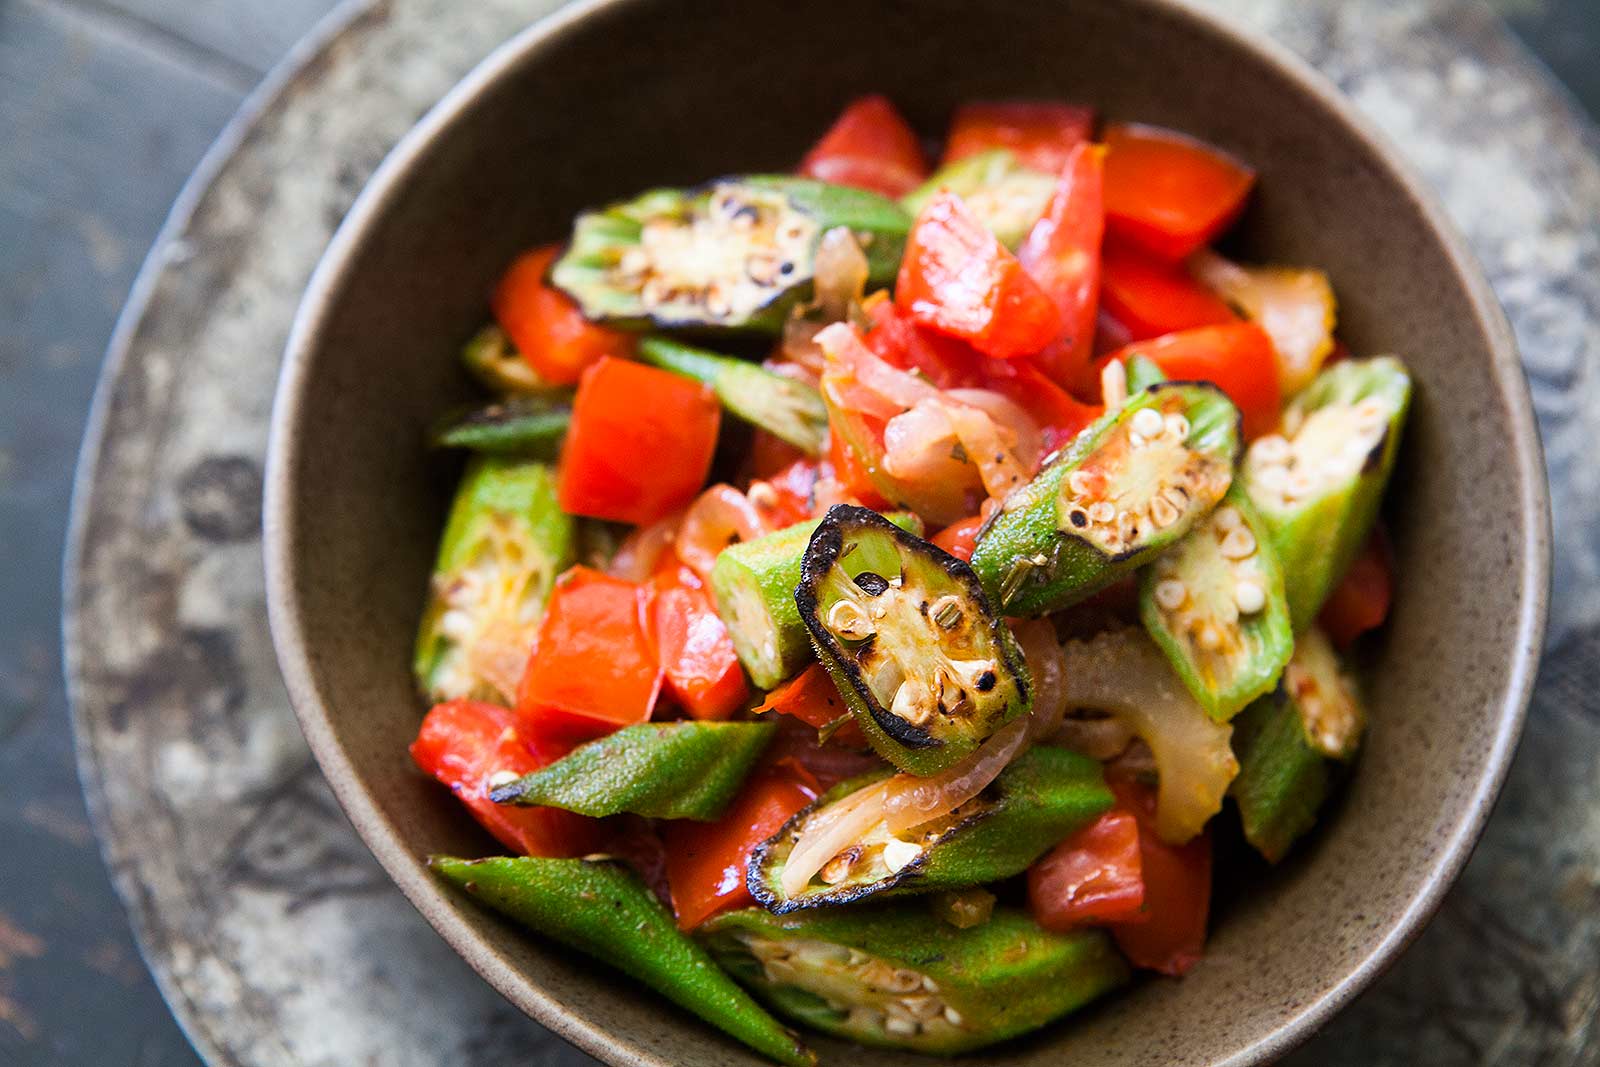
I love okra in its non-slimy states. I feel it’s used too frequently in stews and gumbos where its flavor can be lost. I love it pickled, fried, or, as in this recipe, seared to really bring out its fresh taste and eliminate the gelatinous texture that I’m not a fan of.
Ingredients
- 5 tablespoons extra virgin olive oil
- 1 celery rib, sliced thin
- 1/2 onion, sliced thin
- 1 jalapeño chile, seeded, sliced thin
- 3 garlic cloves, sliced thin
- 1 tablespoon tomato paste
- 2 tablespoons red wine vinegar
- 1 1/2 cups chicken or vegetable broth
- 1 teaspoon minced fresh rosemary
- 1/2 to 3/4 pound fresh okra
- 5 plum tomatoes, diced
- Salt and pepper
Instructions
Heat 3 tablespoons of the olive oil in a large, wide pan over medium-high heat. When the oil is hot, sauté the onion, jalapeño and celery for 2 minutes, stirring once or twice. Add garlic and sauté for another minute or two. While the vegetables are sautéing, mix the tomato paste, broth and vinegar until they are combined. Add to the pan with the vegetables and bring to boil. Add rosemary and pinch of salt. As sauce is boiling, slice okra on the bias to create diagonal pieces. Wait to cut the okra until the last minute in order to help make it less slimy. Heat another pan over high heat, add remaining oil and get it almost smoking hot. Add sliced okra and spread out in a single layer in the pan. Let the okra pieces brown before you move them. The high heat sears the okra and helps limit the slime. Sear it for 3-4 minutes, stirring 2-3 times. As soon as the okra is done, add it to the boiling sauce. Add the diced tomatoes and reduce the heat to a simmer. Cook for 5 minutes, no longer. The tomatoes should still be a bit firm, and you don’t want the okra to get slimy. Turn off the heat, grind black pepper over everything and taste once more for salt. Add if needed. Serve over steamed rice or with lots of crusty bread.
Sweet & Sour Roasted Delicata Squash
Recipe & photo by Shutterbean.com
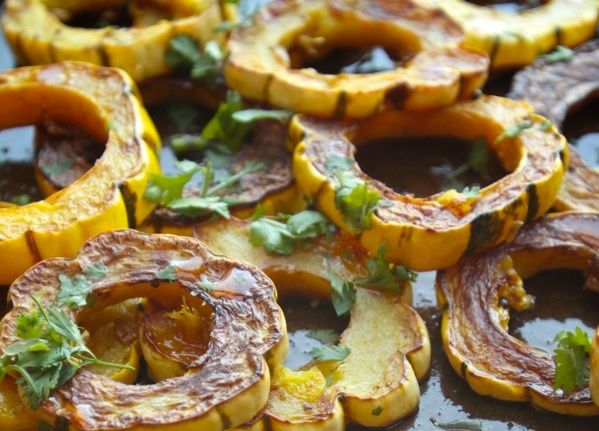
In the fall and winter, I can eat roasted squash every day. And I’m sure I’ve truly tested that theory at times. I sometimes get stuck in a rut of using the same spice blends over and over on different kinds of squashes. I like this recipe because of the Asian flavors it uses to really lift the flavors. Plus, the little squash rings look like flowers, making this recipe just as adorable as it is delicious.
Ingredients
- 3 delicata squash
- 2-3 glugs olive oil
- kosher salt & fresh ground pepper
- juice of 1 lime
- 1 tablespoon sriracha
- 2 tablespoons honey
- 2 tablespoons chopped fresh cilantro, for serving
Instructions
Preheat oven to 400° F. Liberally oil two baking sheets with olive oil and set aside. Cut the ends off of each delicata squash and push the seeds out with a spoon. Cut squash into 1/2-inch pieces and place them on the baking sheets. Toss squash in the olive oil, season with salt & pepper. Place baking sheets in the oven and roast for 20-25 minutes, until the bottoms of the squash have nicely browned. Flip the squash and continue to roast for about 10-15 minutes until both sides are golden brown.
Meanwhile, mix the juice of one lime, sriracha and honey in a small bowl. Drizzle honey sriracha glaze over hot squash and finish with a sprinkle of chopped cilantro. Serve warm.
Sauteed Green Beans with Garlic
Recipe & photo by theendlessmeal.com
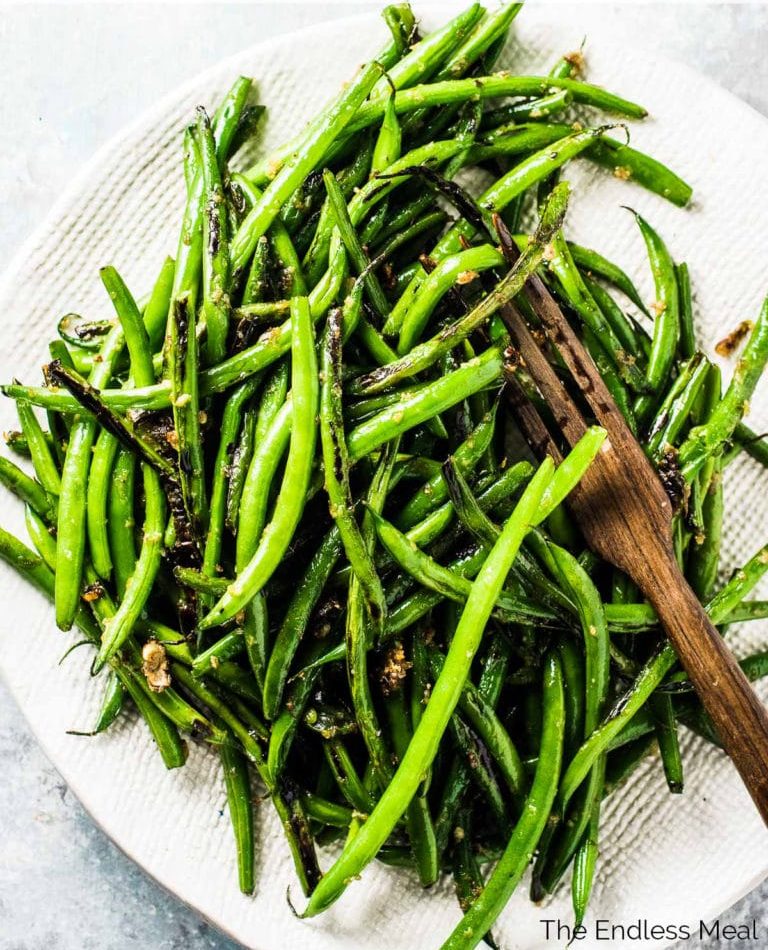
I was recently handed a bag of fresh stringless beans from a friend who couldn’t use her CSA share since she was heading out of town. What do I do with a bag of green beans that won’t kill their flavor and their “snap”? Luckily, I stumbled upon this recipe using ingredients I always have on hand. Let me tell you, I may never eat green beans any other way. The texture and flavors made the perfect side to my salmon that night, and I’ll be making it to go with many more dishes, or I might just make a pan to eat alone. They’re that good.
Ingredients
- 1 tablespoon olive oil
- 1 lb. green beans, trimmed
- 3 garlic cloves, very finely minced
- 1/2 teaspoon sea salt
Instructions
Heat a large pan over high heat. When it’s hot, add the oil and green beans. Cook the green beans, tossing occasionally, until soft and starting to blister and turning black in a few spots, about 5 minutes. Add the garlic to the pan and cook the beans for 1 minute more. Remove the pan from the heat and toss with the sea salt.
Roasted Rutabaga with Rosemary & Onions
Recipe & photo by the Low Carb Maven blog
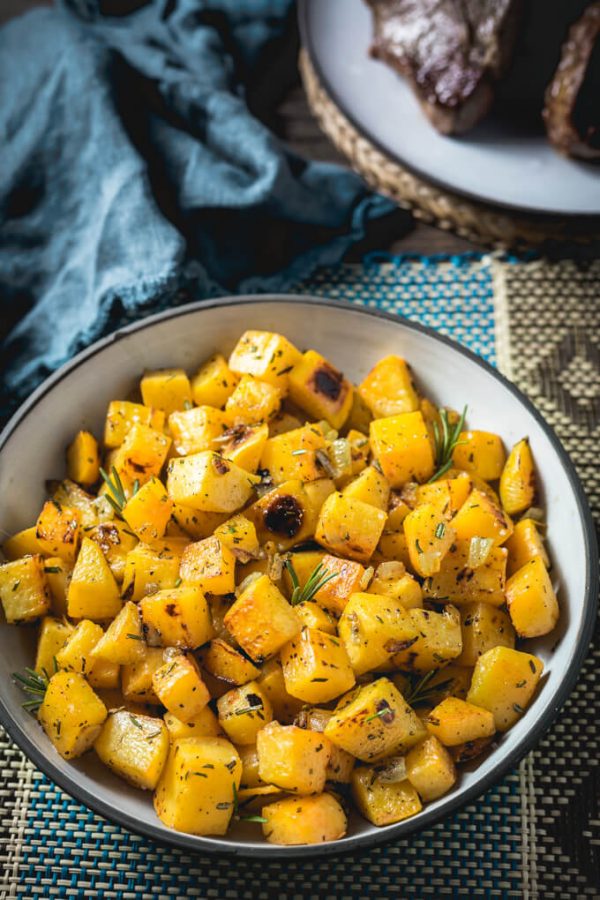
I never grew up eating rutabaga, so when I’d meet customers in the store looking for it, I’d sometimes ask them how they like to prepare it. This root vegetable, much like my go-to method for squash, lends itself very well to roasting, it turns out. So here’s an easy way to introduce yourself to this lower-carb potato alternative.
Ingredients
- 1 pound rutabaga, peeled and cut into 3/4-inch cubes
- 1/4 cup diced onion
- 1 tbsp chopped fresh rosemary
- 1 tbsp olive oil
- 1/4 tsp salt
- 1/8 tsp freshly ground pepper
- 1 tbsp butter or ghee
Instructions
Preheat oven to 400° F and place rack in middle position. Line a sheet pan with parchment paper. Toss cubed rutabaga with onion, rosemary, olive oil, salt, and pepper and spread onto the sheet pan in an even layer. Bake for 20-30 minutes or until fork tender. Heat a medium-large frying pan over medium heat. When hot, add the butter and swirl to coat the pan. Fry the rutabaga until browned. Serve warm.
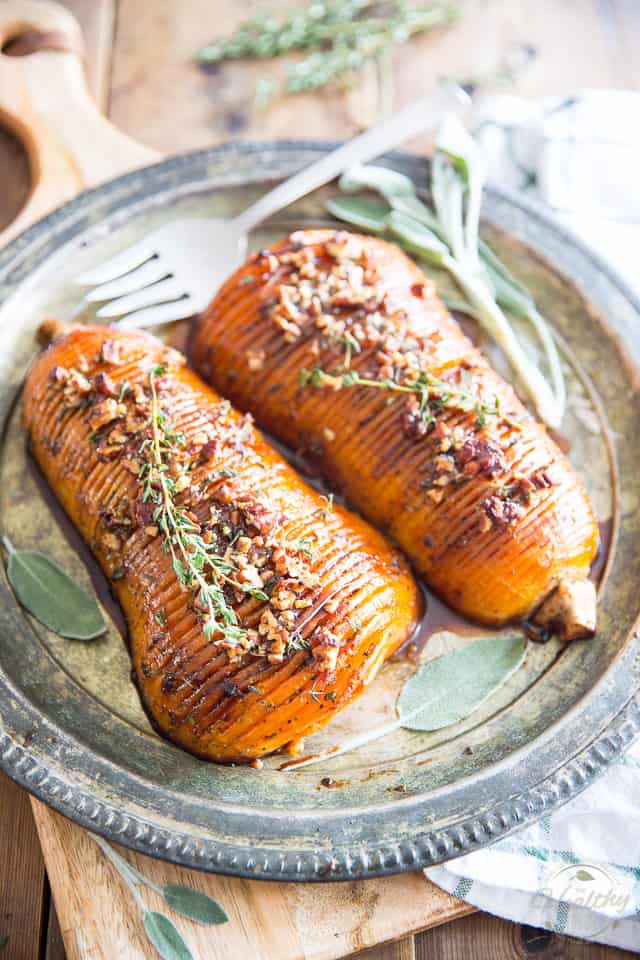
Honey Glazed Hasselback Butternut Squash
Recipe & photo by The Healthy Foodie blog
As you may have guessed, I couldn’t leave you with just one squash recipe if we’re truly eating seasonally. I first heard of the Hasselback method used on potatoes, which led me to a google sesh that brought me to this beauty. Cubing butternut squash is cumbersome. I’m not saying this method is any easier, but BOY! it is elegant! Use this recipe to fancy up a weeknight dinner or use it to impress guests at your next dinner party. You could even hold onto this one for Thanksgiving, but make sure you practice it first. Once you taste it, you’ll want to practice over and over again. You know, for science. I like to throw a little diced garlic on mine for an extra savory punch.
Ingredients
- 1 medium butternut squash (about 1kg | 2.2lb)
- ¼ cup (80g | 2.8oz) unpasteurized honey
- 2 tbsp extra-virgin olive oil
- 1 tbsp Dijon mustard
- 1 tbsp finely chopped fresh sage leaves
- 1 tsp finely chopped fresh thyme
- 1 tsp salt (I use Himalayan salt)
- ½ tsp ground black pepper
- 3-4 tbsp chopped pecans
Instructions
- Preheat your oven to 425°F and place a rack in the top third position. Carefully cut the butternut squash in half lengthwise, scoop out the seeds and completely remove the tough outer skin with a vegetable peeler.
- Place both halves cut side down on a roasting pan and bake for 20 minutes; remove from oven and let cool until you can safely handle the squash with your bare fingers, about 5 minutes.
- While the squash is in the oven, combine the honey, olive oil, Dijon mustard, chopped herbs, salt and pepper in a small bowl and mix well with a small whisk until completely combined.
- Remove one squash half to a cutting board and place the handle of a wooden spoon (or other wooden utensil) on either side of the squash. These will act as guards and will prevent your blade from going all the way as you slice through the squash. With the help of a sharp knife, carefully cut very thin slits in the squash, starting at the narrow end; always be mindful not to cut all the way through. Return the sliced squash to the baking sheet and repeat with the second half.
- Brush about ⅓ of the honey mixture over the squash halves, trying as best you can to force the mixture down the slits. Add ¼ cup of water to the bottom of the pan and return to oven for 15 minutes.
- When the squash is in the oven, always keep a close eye on things to make sure that the syrup at the bottom of the pan doesn’t burn; add a little bit more water, a few tablespoons at a time, if necessary.
- After 15 minutes, remove the squash from the oven and brush with more of the honey mixture as well as with some of the cooking liquid that’s now at bottom of the pan (this will add tons of color and flavor!)
- Add another ¼ cup water to bottom of the pan and return to the oven for a further 15 minutes.
- Remove the squash from the oven once more and brush it with some of the pan juices.
- Add the chopped pecans to the remaining honey glaze and stir to combine. Spoon that mixture over the top of the squash, dividing it equally between both halves.
- Add another ¼ cup water to bottom of the roasting pan and return it to the oven for a final 5 minutes, or until the squash is beautifully golden and tender.
- Remove from oven; spoon some of the pan juices over the squash, sprinkle with a little bit of fresh herbs and a pinch of salt.
- Very carefully transfer to a serving plate and serve.